One of the most common issues Windows users face is high CPU usage, which can significantly impact system performance. If you’re running Windows 8.1 or any other version of Windows, you may have encountered the Windows Modules Installer Worker consuming a large portion of your CPU resources. This comprehensive guide will explore the causes of this issue, how to fix it, and ways to optimize your system for better performance.
Table of Contents
- Understanding Windows Modules Installer Worker
- Why Does Windows Modules Installer Worker Cause High CPU Usage?
- How to Check If Windows Modules Installer Worker Is Causing High CPU Usage
- Solutions to Fix Windows Modules Installer Worker High CPU Usage
- Optimizing Windows 8.1 for Better Performance
- Troubleshooting Common Issues
- How to Prevent Windows Modules Installer Worker from Causing High CPU Usage
- Understanding the Impact of Windows Updates on System Performance
- Advanced Tips for Managing Windows Updates
- Frequently Asked Questions
Understanding Windows Modules Installer Worker
The Windows Modules Installer Worker, also known as TiWorker.exe, is a crucial system process responsible for handling Windows updates. It checks for new updates, installs them, and ensures that your system stays secure and up-to-date. However, this process can sometimes cause high CPU usage, leading to performance issues, especially on systems running Windows 8.1 and other older versions of Windows.
Key Functions of Windows Modules Installer Worker
- Checking for Updates: Automatically searches for available Windows updates.
- Installing Updates: Installs updates that are downloaded from Microsoft’s servers.
- Maintaining System Integrity: Ensures that all updates are correctly installed and that system files are up-to-date.
While the Windows Modules Installer Worker is essential for system maintenance, it can sometimes become resource-intensive, causing high CPU usage and slowing down your computer.
Why Does Windows Modules Installer Worker Cause High CPU Usage?
High CPU usage caused by the Windows Modules Installer Worker can occur for several reasons. Understanding these causes can help you identify and address the issue more effectively.
Common Causes of High CPU Usage
- Pending Windows Updates: If there are pending updates that haven’t been installed, the Windows Modules Installer Worker may use more CPU resources to complete the installation.
- Corrupted Update Files: Sometimes, update files can become corrupted, causing the process to hang and consume excessive CPU power.
- Continuous Search for Updates: On systems with poor internet connectivity, the process may continuously search for updates, leading to high CPU usage.
- Background Installations: When updates are being installed in the background, the process may temporarily use more CPU power, especially for large updates.
How to Check If Windows Modules Installer Worker Is Causing High CPU Usage
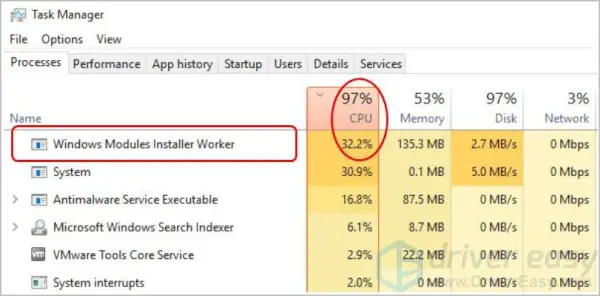
Before proceeding with any fixes, it’s important to confirm that the Windows Modules Installer Worker is indeed the process responsible for the high CPU usage. You can do this using the Task Manager in Windows.
Steps to Check High CPU Usage in Task Manager
- Press Ctrl + Shift + Esc to open the Task Manager.
- Click on the Processes tab to view all running processes.
- Look for Windows Modules Installer Worker or TiWorker.exe in the list.
- Check the CPU column to see how much CPU the process is using.
If you notice that the Windows Modules Installer Worker is consistently using a high percentage of your CPU, it’s time to address the issue with the solutions outlined below.
Solutions to Fix Windows Modules Installer Worker High CPU Usage
There are several methods to reduce or eliminate high CPU usage caused by the Windows Modules Installer Worker. Below are detailed solutions to help you fix this issue and improve your system’s performance.
Solution 1: Restart the Windows Update Service
Restarting the Windows Update service can sometimes resolve high CPU usage issues. This forces the service to restart its processes and can clear any stuck or corrupted tasks.
Steps to Restart the Windows Update Service:
- Press Windows + R to open the Run dialog box.
- Type services.msc and press Enter to open the Services window.
- Scroll down to find Windows Update in the list of services.
- Right-click on Windows Update and select Restart.
- Wait for the service to restart and check if the CPU usage has decreased.
Solution 2: Run the Windows Update Troubleshooter
Windows includes a built-in troubleshooter designed to automatically find and fix problems with the Windows Update service. Running this troubleshooter can help resolve issues that cause high CPU usage.
Steps to Run the Windows Update Troubleshooter:
- Open the Control Panel and select Troubleshooting.
- Click on Fix problems with Windows Update under the System and Security section.
- Follow the on-screen instructions to complete the troubleshooting process.
- Once the troubleshooter has finished, restart your computer and check if the issue is resolved.
Solution 3: Perform a Clean Boot
A clean boot starts Windows with a minimal set of drivers and startup programs, which can help identify if a background process is causing the high CPU usage.
Steps to Perform a Clean Boot:
- Press Windows + R, type msconfig, and press Enter.
- In the System Configuration window, go to the Services tab.
- Check the box for Hide all Microsoft services and then click Disable all.
- Go to the Startup tab and click Open Task Manager.
- Disable all startup items listed in the Task Manager.
- Close the Task Manager and click OK in the System Configuration window.
- Restart your computer and see if the CPU usage has improved.
Solution 4: Use the DISM and SFC Tools
Corrupted system files can sometimes cause the Windows Modules Installer Worker to behave abnormally. The DISM (Deployment Image Servicing and Management) and SFC (System File Checker) tools can repair these files.
Steps to Use DISM and SFC:
- Open the Command Prompt as an administrator by pressing Windows + X and selecting Command Prompt (Admin).
- Type the following command and press Enter:
DISM /Online /Cleanup-Image /RestoreHealth - Wait for the process to complete, which may take several minutes.
- Once DISM is finished, type the following command and press Enter:
sfc /scannow - Allow the SFC tool to scan and repair any corrupted files. Restart your computer after the process is complete.
Solution 5: Disable the Windows Modules Installer Worker (Advanced)
If none of the above solutions work, you can disable the Windows Modules Installer Worker service. However, this should be a last resort, as it may prevent your system from receiving important updates.
Steps to Disable the Service:
- Open the Services window by pressing Windows + R, typing services.msc, and pressing Enter.
- Find Windows Modules Installer in the list and double-click on it.
- In the properties window, set the Startup type to Manual or Disabled.
- Click Apply and then OK to save the changes.
- Restart your computer to apply the changes.
Disabling the service will prevent it from running automatically, which should reduce CPU usage. However, you will need to manually check for and install updates if you choose to disable this service.
Optimizing Windows 8.1 for Better Performance
In addition to fixing the high CPU usage caused by the Windows Modules Installer Worker, optimizing your system can further improve overall performance. Below are several optimization tips specifically for users running Windows 8.1.
Tip 1: Adjust Power Settings
Using the right power settings can help balance performance and energy consumption, particularly for laptops.
Steps to Adjust Power Settings:
- Open the Control Panel and select Power Options.
- Choose the High performance plan to maximize CPU and system performance.
- Alternatively, customize a power plan by clicking Change plan settings and adjusting the options to fit your needs.
Tip 2: Disable Unnecessary Startup Programs
Many programs start automatically when you boot up your computer, which can slow down system performance. Disabling these can free up resources.
Steps to Disable Startup Programs:
- Open Task Manager by pressing Ctrl + Shift + Esc.
- Go to the Startup tab.
- Review the list of programs and disable any that you do not need to start automatically.
Tip 3: Perform Regular Disk Cleanup
Disk Cleanup can remove temporary files, system caches, and other unnecessary data that can clog up your system.
Steps to Perform Disk Cleanup:
- Press Windows + R to open the Run dialog box.
- Type cleanmgr and press Enter.
- Select the drive you want to clean (usually C:), then click OK.
- Check the boxes for the types of files you want to delete and click OK.
- Click Delete Files to confirm and start the cleanup.
Tip 4: Update Device Drivers
Outdated or incompatible device drivers can cause system instability and performance issues. Keeping your drivers updated ensures optimal hardware performance.
Steps to Update Device Drivers:
- Open Device Manager by pressing Windows + X and selecting Device Manager.
- Expand the categories to find the devices you want to update.
- Right-click on the device and select Update driver.
- Choose Search automatically for updated driver software.
Tip 5: Increase Virtual Memory
Virtual memory, also known as the paging file, is an area on your hard drive that Windows uses as if it were RAM. Increasing virtual memory can help improve performance, especially on systems with limited RAM.
Steps to Increase Virtual Memory:
- Right-click on This PC and select Properties.
- Click on Advanced system settings on the left.
- Under the Performance section, click Settings.
- Go to the Advanced tab and click Change under Virtual Memory.
- Uncheck Automatically manage paging file size for all drives.
- Select Custom size and enter the initial and maximum size values (typically 1.5 to 3 times your RAM size).
- Click Set, then OK to apply the changes.
Troubleshooting Common Issues
Even after applying the fixes and optimizations mentioned above, you may encounter some common issues related to high CPU usage. Below are troubleshooting tips to help you resolve these problems.
Issue 1: High CPU Usage Persists After Applying Fixes
If high CPU usage continues even after trying the solutions mentioned earlier, consider the following:
- Check for malware or viruses that may be causing the issue. Run a full system scan with your antivirus software.
- Verify that all Windows updates have been successfully installed, as incomplete updates can cause problems.
- Consider resetting Windows Update components using the Command Prompt.
Issue 2: System Slows Down During Updates
If your system slows down significantly during updates, it may be due to limited system resources. Here’s what you can do:
- Pause or delay other resource-intensive tasks until the update process is complete.
- Ensure that your system has enough free space on the hard drive for the update files.
- Consider upgrading your hardware if the issue persists, such as adding more RAM or using a faster hard drive (e.g., SSD).
Issue 3: Windows Modules Installer Worker Not Responding
If the Windows Modules Installer Worker becomes unresponsive, you can try the following steps:
- Terminate the process using Task Manager and then restart your computer.
- Check the Event Viewer for any error messages related to the Windows Modules Installer Worker.
- Run the System File Checker (SFC) and DISM tools to repair any corrupted system files.
How to Prevent Windows Modules Installer Worker from Causing High CPU Usage
Preventing the Windows Modules Installer Worker from causing high CPU usage involves proactive management of updates and system settings. Here are some strategies to prevent future issues.
Tip 1: Schedule Updates During Off-Peak Hours
Scheduling Windows updates during times when you’re not actively using your computer can prevent the Windows Modules Installer Worker from interfering with your work.
Steps to Schedule Updates:
- Go to Settings and select Update & Security.
- Click on Windows Update and then Change active hours.
- Set the hours when you’re most active, and Windows will avoid performing updates during this time.
Tip 2: Disable Automatic Updates (Advanced)
If you prefer to control when updates are installed, you can disable automatic updates. However, this means you’ll need to manually check for and install updates regularly.
Steps to Disable Automatic Updates:
- Open the Services window by pressing Windows + R, typing services.msc, and pressing Enter.
- Find Windows Update in the list and double-click on it.
- In the properties window, set the Startup type to Manual or Disabled.
- Click Apply and then OK to save the changes.
Tip 3: Regularly Clean Your System
Performing regular system maintenance, such as cleaning up disk space, removing unnecessary programs, and defragmenting your hard drive, can help prevent performance issues related to Windows updates.
Understanding the Impact of Windows Updates on System Performance
Windows updates are essential for keeping your system secure and up-to-date, but they can also impact performance, especially during the installation process. Understanding how updates work can help you manage their impact on your system.
How Windows Updates Affect Performance
- CPU and Memory Usage: During updates, the Windows Modules Installer Worker may use a significant amount of CPU and memory resources.
- Disk Usage: Updates often involve downloading and writing large files to your hard drive, which can cause high disk usage.
- System Reboots: Some updates require your system to reboot, which can interrupt your workflow.
Managing the Impact of Updates
- Use Metered Connections: Setting your internet connection as metered can delay non-critical updates, giving you more control over when they are installed.
- Pause Updates: Temporarily pausing updates can prevent interruptions during critical work periods.
- Regular Maintenance: Keeping your system well-maintained can help minimize the performance impact of updates.
Advanced Tips for Managing Windows Updates
For users who want more control over Windows updates, there are advanced tools and techniques that can help you manage the update process more effectively.
Tip 1: Use Group Policy Editor (Windows Pro/Enterprise)
Group Policy Editor allows you to configure advanced update settings, such as disabling automatic updates, setting update policies, and more.
Steps to Access Group Policy Editor:
- Press Windows + R, type gpedit.msc, and press Enter.
- Navigate to Computer Configuration > Administrative Templates > Windows Components > Windows Update.
- Configure the available settings to control how updates are delivered and installed.
Tip 2: Use Windows Update Blocker
Windows Update Blocker is a third-party tool that allows you to easily disable and enable Windows updates with a single click.
Steps to Use Windows Update Blocker:
- Download Windows Update Blocker from a trusted source.
- Run the program and select Disable Updates.
- Click Apply Now to save the changes.
Tip 3: Set Up Deferred Updates
Windows allows you to defer feature updates for a certain period, which can help avoid issues with new updates until they are more stable.
Steps to Defer Updates:
- Go to Settings > Update & Security > Windows Update > Advanced options.
- Under Choose when updates are installed, select the number of days you want to defer feature updates.
Frequently Asked Questions
Why is Windows Modules Installer Worker using so much CPU?
The Windows Modules Installer Worker may use high CPU resources when it’s installing updates, especially if there are pending updates or corrupted files that need to be processed.
Can I disable Windows Modules Installer Worker?
Yes, you can disable it, but it’s not recommended as it will prevent Windows from automatically installing updates. It’s better to troubleshoot the issue rather than disabling the service.
How can I permanently fix high CPU usage from Windows Modules Installer Worker?
Running the Windows Update troubleshooter, restarting the update service, and performing a clean boot are some effective methods to reduce high CPU usage permanently.
Will optimizing Windows 8.1 improve performance?
Yes, optimizing Windows 8.1 by adjusting power settings, disabling unnecessary startup programs, and regularly performing disk cleanup can significantly improve system performance.
Is it safe to use third-party tools to manage Windows updates?
While third-party tools like Windows Update Blocker can be useful, they should be used with caution and only downloaded from trusted sources to avoid security risks.


